.png)
Terrakami - Affordable Cargo Crates Review
In my search for affordable but quality looking wargaming terrain I have come across a company called Terrakami (thanks to Conrad Gonsalves). They deal with a large number of different MDF terrain including a really awesome grav train and container crane. I recently picked up a steal on eBay in the shape of a child's cast crane with fully working parts, so came the idea that I would put a shipyard together.
So I went ahead and ordered the following:
So I went ahead and ordered the following:
Terrakami Low Cost Large Container (contains 2) x2
Terrakami Medium Container (contains 2) x2
Terrakami SF Cargo Boxes (contains 8)
Terrakami SF Cargo Boxes 40x20 (contains 10)
That little bundle came to a surprising £45.10 which included postage, packaging and taxes.
Not a bad deal considering my eBay crane was £4. Provided I didn't spend another £1 I had a full board for under £50. I will be using the terrain in a variety of small skirmish games but mainly Infinity and Relic Knights so I wanted the colours to be pretty vibrant and futuristic.
 |
| One of the Large Terrakami Containers off the MDF sprue |
My only gripe was the wait time it took to transport the packages from Spain (9-10 days) but this is not Terrakami's fault and because of how cheap this ended up being I am still one happy customer, this also turned out to be a blessing as I have a painting queue that stretches into the nether regions of the cosmos.
 |
| Elastic bands to keep pressure on the joins whilst the PVA sets |
Once they had arrived I took a look at the components. It all seems pretty straight forward, the instructions are in some cases missing but lets be honest, if I can put my Malifaux miniatures together I can put a cube together. Popping the laser cut MDF pieces was a dream, nothing was miscut or got caught and half an hour later I had the bits out and separated ready to go. Armed with a huge pot of PVA glue and rubber bands I set about piecing these together. This is when I realised the sheer number of crates I had. It took me roughly 4 hours to get through the entire lot but by the end of it I had something that looks like the picture below. Awesome! I definitely recommend using elastic bands to hold the PVA together whilst it goes off, you want some solid terrain that can survive a beating.
 |
| Terrakami crates all glued and elastic bands removed |
Now, you could simply leave your crates like this, they look great and would improve any wargaming table by just being there but being me and feeling the need to paint everything I wanted to add some variety and vibrancy to the table. So I set about undercoating these in a mixture of black, white and grey primer. Make sure you use a good primer for this else you are just wasting your money, you need a good seal so you can paint over it and not let the MDF soak up all your paint.
 |
| Undercoated crates in a mixture of white, black and grey primer (I used army painter) |
Next up was laying down a base coat. I had some cheap acrylic paints from Amazon knocking around so I used these, don't use your expensive hobby paints as the MDF still will soak up a lot of paint at this stage. Something like these acrylic paints from Amazon work really well. Try to get a relatively streak-less base coat down (this will be impossible though) and mind the drips! I have a few areas which got a heavier coat but never mind.
 |
| First coat of cheap acrylic paint |
After this stage? Yes, you guessed it another coat of the base colour, make sure you leave the paint long enough to set between coats. This was to flatten out the colour and again stop the MDF soaking up more paint. Finally after a second coat I gave it yet another final coat so three in total, but I think you could get away with just the two with some patience. I then used half a pot of Vallejo Black Wash to cover all the crates, this was to define all the details in the MDF which are really great from Terrakami. You can go really heavy with the wash and getting some pooling looks really nice as you can use it later (more on this).
 |
| Cargo Crates after three coats of acrylic and a black wash |
Now leave the wash to dry completely, this takes quite a bit of time but its worth the wait, go put together some Malifaux or paint another army... Once completely dry I dry brushed another acrylic layer of colour over the top of the wash to pick up on the edges, this was a really quick dry brush. Then I took my base colour and highlighted it with some of the white acrylic roughly a 50/50 mix and started highlighting all the edges facing the top of the container, try and do this where the light would catch. This really helps to make the profile of the containers stand out.
I then added the weathering effects to the containers. This was a simple quick and dirty way, using a spare mournfang brown paint I had lying around. Simply splodge on an area of brown and then drybrush downwards for a rust effect (water runs down). Do this in areas like the edges of sharp parts of the container, the doors and the sides also across the top. Remember those pooled areas of wash from earlier? Use those as areas to make use of weathering too, just make sure its random and different between each crate. I then filled in the brown "splodge" with some metallic silver to show the underlying metal coming through. After this stage was finished I finally washed over it with some more black wash. Still with me so far? The result was this.
 |
| Base colour, washed and weathered crates |
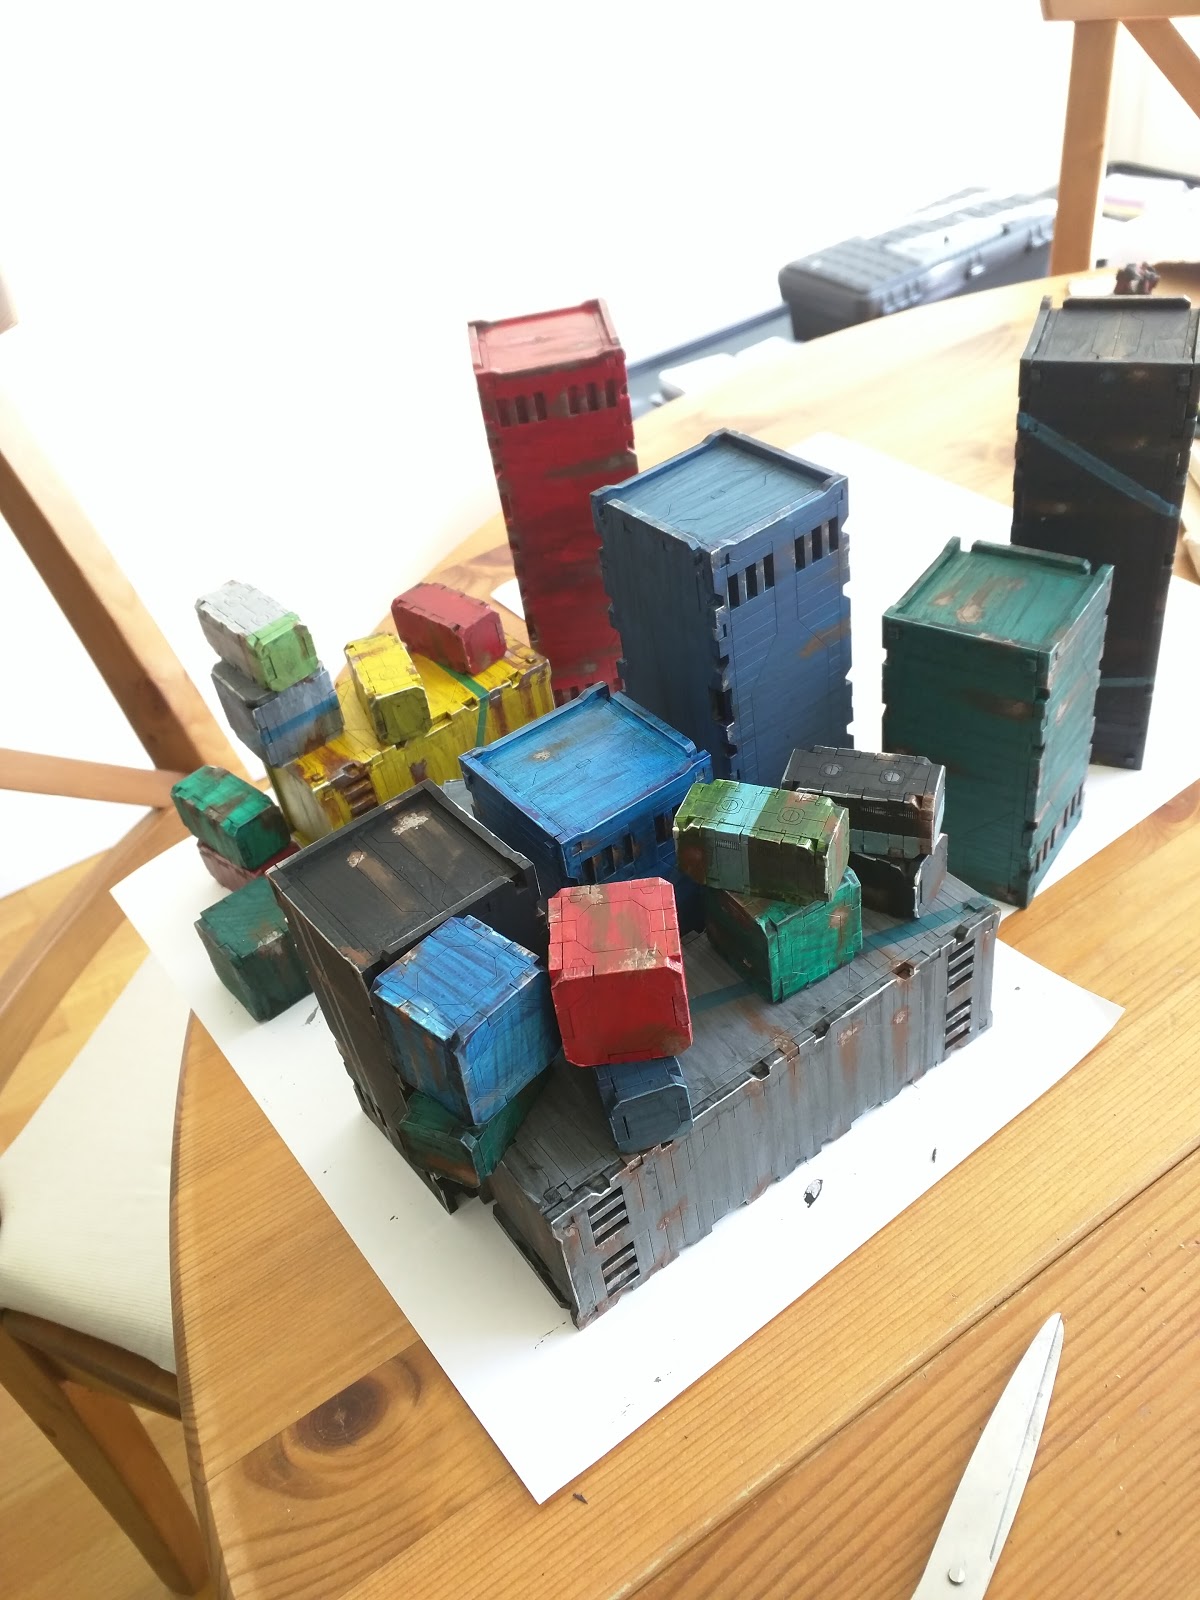
But why stop there! I taped out some lines on the boxes and started to add some painted stripes in differing colours to break up the uniform boxes. Try doing these diagonally, horizontally and vertically for different effects. Also Terrakami give you some great stencils to work with in the small crates box so I took all the crates and my spray paint and went mad spraying on decals. This is a really nice touch by Terrakami, some great thought to an already excellent product. The finished result was something like this.
 |
| Finished Terrakami Cargo Containers painted and ready for gaming! |
I was really impressed with how these turned out for a one day job. They work great at filling up our gaming table and I got to test them out straight away, here are some of the shots from gaming the following day.All in all I am very impressed with Terrakami with such a low costing solution to filling up your gaming table. With a bit of extra work you can make them look truly awesome and do them justice. I can't stop raving about them, so go buy some more and keep them in business!


0 comments :